As a work of art, a mosaic is a picture created using glass or ceramic tiles and grout. Mosaic can be used to decorate a church ceiling with its exquisite details, or it can be used to decorate a coffee table in the home with a simple pattern. After practice, you can do it yourself and use your design talent to make a mosaic.
Design Your Own Pattern
Select the base on which the tesserae will be glued. You can create a mosaic on almost any flat surface. It must be strong enough to bear the weight of the inlays, glue, and grout. Tables, planters, birdbaths, and stepping stones are all great options.
- Be sure to clean the base of dirt and debris before use. Wipe away any stuck-on debris with a damp sponge. Wait until the base is completely dry before starting to glue the tesserae.
- The base can be of any shape, but be careful with sharp curves as you may have to fill them with very small tesserae pieces.
- The best base for outdoor mosaics is concrete because it is the most weather-resistant. You can buy thin concrete slabs at your local building supply store.
- Metal mesh pizza pans are particularly suitable for creating decorative glass gem mosaics.
- Terracotta bases are not safe for outdoor mosaics because they are not resistant to low temperatures. For example, if you want to make a mosaic on a clay pot, you’ll need to bring it inside when the weather gets cold or apply a few coats of sealant when you’re done to protect it from the elements.
Choose the materials to use for your mosaic design. The small pieces of material used in mosaics are called tesserae. They can be glass, stone, porcelain, shells, or anything you can find. If you don’t have any materials nearby, try purchasing tesserae blocks from your local craft store.
- Consider the size of the mosaic base when collecting mosaic pieces. If you’re not sure, place the tesserae on the base. They must be able to completely cover the base.
- If you want to use old materials to create a mosaic, be sure to wash off any dirt or debris with soap and water. Wait until they are completely dry before starting.
- You can also add other items or decorations to the mosaic, such as small porcelain flowers.
- You can also use broken porcelain plates as mosaics. Place the plates into a plastic bag and use a hammer to break them, one at a time. You can also use tile pliers to cut porcelain plates, which gives you more control over the size and shape of the pieces. To make a medium-sized mosaic, approximately 50 cm by 60 cm, you will need 5 to 7 porcelain plates. Cups are not suitable for making mosaics because their pieces are not flat and difficult to arrange and glue.
- Round glass gemstones are a safer setting for children because they have no sharp edges. You can buy this gemstone at your local craft store. They come in many different colors and sizes.
Sketch the design on the base. Draw a mosaic pattern from a picture book, or create a simple sketch of your own. Remember, the more detailed the design, the smaller the tesserae to be used.
- If you’ve already sketched it on paper, you can use tracing paper to trace the design onto the base.
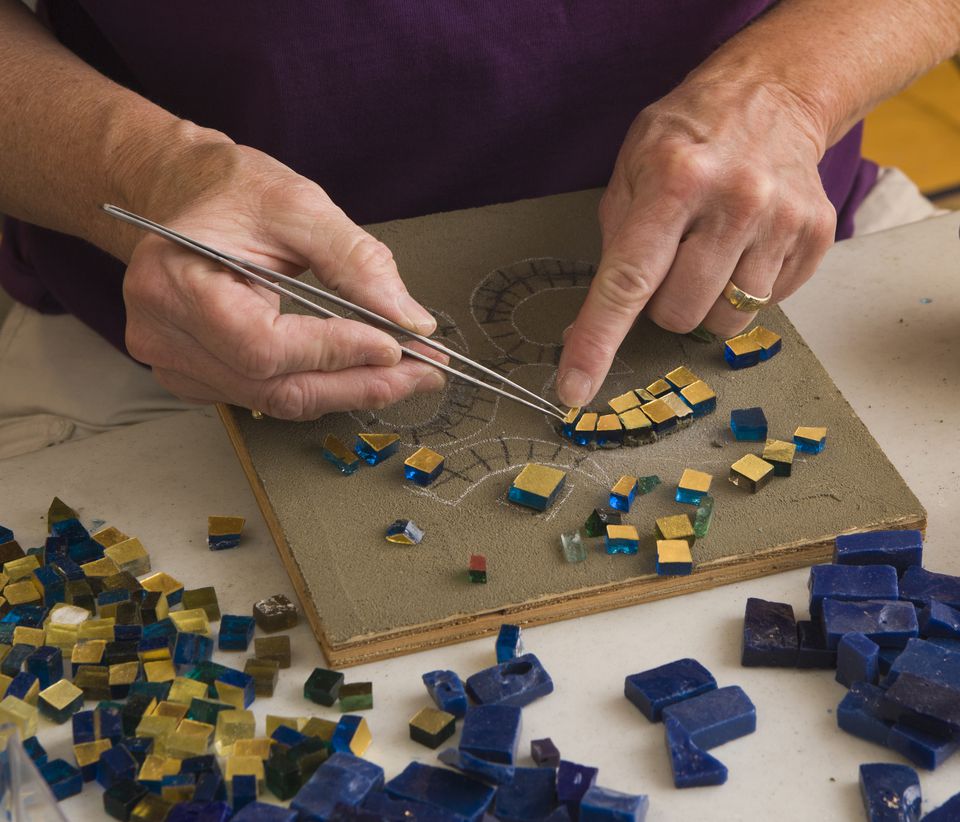
Lay the tesserae onto the design before gluing it on. Before pasting, place the mosaic pieces on the design pattern and arrange them according to the design to see the effect. Make sure the tesserae are free of any dirt or debris before laying it down.
- If necessary, you can use a hammer or tile pliers to make the tesserae smaller.
Glue on the Inlay
Choose an adhesive suitable for the material being used. The traditional adhesive for mosaics is mortar. It is made from a mixture of cement, sand, and water. But you can also use acrylic adhesive, epoxy, or construction adhesive. Go to your local craft or hardware store to buy the right adhesive. Check the “How to use” on the label first. You’ll need an adhesive that will bond the base and upholstery material.
- If your mosaic will be placed outdoors, be sure to purchase adhesive that is labeled waterproof.
- For mosaics in areas such as shower floors that often get wet, you should use a thin base of mortar.
- Acrylic adhesives are easy to use and stick strongly, making them suitable for smooth surfaces such as ceramics and glass.
- Epoxy resin is very effective at adhering to metal, but it easily stains the surrounding environment when used and has an odor.
If necessary, stir the adhesive according to the manufacturer’s instructions. Check the adhesive’s label to see if it requires stirring before use. The mortar and epoxy resin need to be mixed in advance. Acrylic adhesive comes in a tube ready to use.
- If your adhesive is in powder form, mix it outdoors and wear a dust mask while working to avoid breathing in dust particles.
Use a trowel or scraper to apply the adhesive to the base. Wear rubber gloves when applying adhesive to prevent your hands from getting stuck. Apply adhesive to the base, covering the entire surface.
- You can also apply adhesive directly to each tesserae piece, like butter. Place the adhesive side directly onto the base and press down to hold the tesserae in place. This method also works if you are using an extruded tube of adhesive.
Arrange the tesserae on the design sketch. While the adhesive is still wet, gently push the tesserae into the laid-out pattern. Start at a corner of the design and glue line by line. Make sure the spacing between the tesserae pieces is less than or equal to 0.3 cm.
- If you are using a concave setting piece such as a shell, coat the underside of the shell with adhesive and fill it with the shell before placing the shell on the base.
Let the adhesive set. The time required varies depending on the type of adhesive used and the location of the mosaic, so you should check the adhesive’s label and follow the instructions above. Once the adhesive has been set, wipe the setting piece with a damp sponge to remove any excess adhesive material that has squeezed onto it.
- Wipe off excess mortar as soon as possible after the mortar has set. Once the adhesive has fully cured, it will be difficult to remove excess material from the tesserae. After setting, a complete cure usually takes 24 hours.
- If you are using traditional mortar, 24 hours is usually sufficient for interior mosaics. The mortar used for outdoor mosaics takes 72 hours to set.
- It usually takes 12 to 24 hours for acrylic adhesives and epoxy resins to fully set.
Add Grout and Sealant
Choose a grout. The grouting compound is a fine-textured grout. Adding grout can fill the gaps between the tesserae pieces. It also unifies and enhances the design. Grout comes in a variety of colors, and you can even paint it yourself to match the color of your mosaic perfectly. Choosing contrasting colors to make your design stand out is best for this purpose.
- If you are using an uneven or porous material such as shells or irregular stones, you do not need to fill the mosaic with grout.
- If you’re not sure what color grout to use, black is usually the best choice; pure white is often too conspicuous and will overwhelm the mosaic design. If you want a lighter color, try using a light yellow grout.
Prepare grouting compound. Prepare grout according to the manufacturer’s instructions. It is best to mix grout outdoors as this process can make the job site messy, dirty, and dusty. When mixing, it is best to protect yourself by wearing rubber gloves, goggles, and a dust mask.
Apply grout with a spatula. Spread some newspaper on the work surface and place the mosaic on top. Cover the entire mosaic with grout, smoothing it out with a spatula to fill in the gaps between the mosaic pieces. The amount of grout used to cover the mosaic must be sufficient to fill the gaps. Work outdoors or in a well-ventilated area.
Allow the grout to set and wipe off the excess. Check the label of the grout to see how long it takes to set. It usually takes about 20 minutes for the grouting agent to set. Then, wipe the mosaic with a clean sponge and warm water. When wiping off the grout on the surface of the mosaic block, remember to rinse the sponge every once in a while.
- If stubborn grout remains on the mosaic, or you waited too long before wiping it down, remove the excess grout with a clean lint-free cloth or crumpled newspaper. Use a non-scratch nylon scrubbing pad or a small wooden stick to remove any large chunks of grout that are stuck to the inlay.
Spray the mosaic with a protective sealant. The sealant covers the mosaics and protects them from damage, especially to outdoor mosaics caused by temperature fluctuations and harsh weather conditions. It also gives the mosaic a high-brightness shine, making the colors stand out even more.
- Wait for the sealant to dry before applying the mosaic.
- If you don’t want your mosaic to be glossy, you can also use a matte finish sealer.
- To protect a mosaic placed outdoors, you must apply at least 2 to 3 coats of sealant. Wait for the sealant to dry before applying the next coat.
Tips
- When choosing mortar or grouting agent, buy a product that lasts longer depending on the environment in which the mosaic will be placed. This should be noted especially when used for outdoor mosaics.
- If you make a mistake while making your mosaic, don’t worry, you can use a flat-blade screwdriver or chisel to pry off the mosaic pieces and then reattach them.